
티스토리 뷰
CloudNet@ 가시다님이 진행하는 AWS EKS Hands-on Study 내용 참고.
5. 노드에 파드 생성 갯수 제한
☞ 사전 준비 : kube-ops-view 설치
# kube-ops-view
helm repo add geek-cookbook https://geek-cookbook.github.io/charts/
helm install kube-ops-view geek-cookbook/kube-ops-view --version 1.2.2 --set service.main.type=LoadBalancer --set env.TZ="Asia/Seoul" --namespace kube-system

# kube-ops-view 접속 URL 확인 (1.5 배율)
kubectl get svc -n kube-system kube-ops-view -o jsonpath='{.status.loadBalancer.ingress[0].hostname}' | awk '{ print "KUBE-OPS-VIEW URL = http://"$1":8080/#scale=1.5"}'

- Secondary IPv4 addresses (기본값) : 인스턴스 유형에 최대 ENI 갯수와 할당 가능 IP 수를 조합하여 선정
☞ 워커 노드의 인스턴스 타입 별 파드 생성 갯수 제한
- 인스턴스 타입 별 ENI 최대 갯수와 할당 가능한 최대 IP 갯수에 따라서 파드 배치 갯수가 결정됨
- 단, aws-node 와 kube-proxy 파드는 호스트의 IP를 사용함으로 최대 갯수에서 제외함

최대 파드 생성 갯수 : (Number of network interfaces for the instance type × (the number of IP addressess per network interface - 1)) + 2
☞ 워커 노드의 인스턴스 정보 확인 : t3.medium 사용 시
# t3 타입의 정보(필터) 확인
aws ec2 describe-instance-types --filters Name=instance-type,Values=t3.\* \
 --query "InstanceTypes[].{Type: InstanceType, MaxENI: NetworkInfo.MaximumNetworkInterfaces, IPv4addr: NetworkInfo.Ipv4AddressesPerInterface}" \
 --output table
--------------------------------------
|        DescribeInstanceTypes       |
+----------+----------+--------------+
| IPv4addr | MaxENI   |    Type      |
+----------+----------+--------------+
|  15      |  4       |  t3.2xlarge  |
|  6       |  3       |  t3.medium   |
|  12      |  3       |  t3.large    |
|  15      |  4       |  t3.xlarge   |
|  2       |  2       |  t3.micro    |
|  2       |  2       |  t3.nano     |
|  4       |  3       |  t3.small    |
+----------+----------+--------------+

# c5 타입의 정보(필터) 확인
aws ec2 describe-instance-types --filters Name=instance-type,Values=c5\*.\* \
 --query "InstanceTypes[].{Type: InstanceType, MaxENI: NetworkInfo.MaximumNetworkInterfaces, IPv4addr: NetworkInfo.Ipv4AddressesPerInterface}" \
 --output table

# 파드 사용 가능 계산 예시 : aws-node 와 kube-proxy 파드는 host-networking 사용으로 IP 2개 남음
((MaxENI * (IPv4addr-1)) + 2)
t3.medium 경우 : ((3 * (6 - 1) + 2 ) = 17개 >> aws-node 와 kube-proxy 2개 제외하면 15개

# 워커노드 상세 정보 확인 : 노드 상세 정보의 Allocatable 에 pods 에 17개 정보 확인
kubectl describe node | grep Allocatable: -A6
Allocatable:
  cpu:                         1930m
  ephemeral-storage:           27905944324
  hugepages-1Gi:               0
  hugepages-2Mi:               0
  memory:                      3388360Ki
  pods:                        17

☞ 최대 파드 생성 및 확인
# 워커 노드 3대 EC2 - 모니터링
while true; do ip -br -c addr show && echo "--------------" ; date "+%Y-%m-%d %H:%M:%S" ; sleep 1; done

# 터미널1
watch -d 'kubectl get pods -o wide'

# 터미널2
## 디플로이먼트 생성
cat <<EOF | kubectl apply -f -
apiVersion: apps/v1
kind: Deployment
metadata:
  name: nginx-deployment
  labels:
    app: nginx
spec:
  replicas: 2
  selector:
    matchLabels:
      app: nginx
  template:
    metadata:
      labels:
        app: nginx
    spec:
      containers:
      - name: nginx
        image: nginx:alpine
        ports:
        - containerPort: 80
EOF

# 파드 확인
kubectl get pod -o wide
kubectl get pod -o=custom-columns=NAME:.metadata.name,IP:.status.podIP

# 파드 증가 테스트 >> 파드 정상 생성 확인, 워커 노드에서 eth, eni 갯수 확인
kubectl scale deployment nginx-deployment --replicas=8

# 파드 증가 테스트 >> 파드 정상 생성 확인, 워커 노드에서 eth, eni 갯수 확인 >> 어떤일이 벌어졌는가?
kubectl scale deployment nginx-deployment --replicas=15

# 파드 증가 테스트 >> 파드 정상 생성 확인, 워커 노드에서 eth, eni 갯수 확인 >> 어떤일이 벌어졌는가?
kubectl scale deployment nginx-deployment --replicas=30

# 파드 증가 테스트 >> 파드 정상 생성 확인, 워커 노드에서 eth, eni 갯수 확인 >> 어떤일이 벌어졌는가?
kubectl scale deployment nginx-deployment --replicas=50

# 파드 생성 실패!
kubectl get pods | grep Pending
nginx-deployment-7fb7fd49b4-d4bk9   0/1     Pending   0          3m37s
nginx-deployment-7fb7fd49b4-qpqbm   0/1     Pending   0          3m37s
...

kubectl describe pod <Pending 파드> | grep Events: -A5
kubectl describe pod nginx-deployment-6c8cb99bb9-48b95 | grep Events: -A5
Events:
  Type     Reason            Age   From               Message
  ----     ------            ----  ----               -------
  Warning  FailedScheduling  2m6s  default-scheduler  0/3 nodes are available: 3 Too many pods. preemption: 0/3 nodes are available: 3 No preemption victims found for incoming pod.

# 디플로이먼트 삭제
kubectl delete deploy nginx-deployment


노드에 배포할 수 있는 파드의 최대 갯수는 지원하는 IP 주소가 주요 요인입니다.
다만 vCPU 30개 미만 EC2 인스턴스 유형은 (k8s 확장 권고값에 따라) 노드에 최대 파드 110개 제한이 되고,
vCPU 30이상 EC2 인스턴스 유형은 (AWS 내부 테스트 권고값에 따라) 노드에 최대 파드 250개 제한을 권고합니다.
https://docs.aws.amazon.com/ko_kr/eks/latest/userguide/choosing-instance-type.html
https://docs.aws.amazon.com/ko_kr/eks/latest/userguide/cni-increase-ip-addresses-procedure.html
https://aws.amazon.com/ko/blogs/containers/amazon-vpc-cni-increases-pods-per-node-limits/
- 해결 방안 : Prefix Delegation, WARM & MIN IP/Prefix Targets, Custom Network

Kubernetes — Node size
ExampleIf you have a Kubernetes cluster in GKE with a single Node of 2GB of memory, only 65% of the available memory is used to run Pods. The reamining memory is necessary to run the OS, Kubelet, CRI, CNI, etc.
docs.google.com
- kube-ops-view 웹 확인 : c5.large 워커 노드 1대에 파드 110개 생성 완료!, 111~114번 파드는 Pending!

EKS Workshop 참고입니다.
- Prefix Delegation : https://www.eksworkshop.com/docs/networking/vpc-cni/prefix/
- Custom Networking : https://www.eksworkshop.com/docs/networking/vpc-cni/custom-networking/
- Security Groups for Pods : https://www.eksworkshop.com/docs/networking/vpc-cni/security-groups-for-pods/
- Network Policies : https://www.eksworkshop.com/docs/networking/vpc-cni/network-policies/
- Amazon VPC Lattice : https://www.eksworkshop.com/docs/networking/vpc-lattice/
6. Service & AWS LoadBalancer Controller
☞ k8s service 소개
- 기존 문제점
- 파드(Pod) 간 통신 시, 다른 파드의 IP 주소를 직접 지정하면 문제가 발생할 수 있음.
- 예를 들어, 파드2의 IP가 변경되면 파드1에서 기존 IP로 접근할 수 없어 통신 오류 발생.
- 서비스(Service)의 역할
- 고정된 IP(ClusterIP) 및 도메인네임(DNS) 제공
- 파드1은 더 이상 파드2의 직접적인 IP(172.16.1.2)를 사용하지 않고, 고정된 서비스 IP(10.200.1.1) 로 요청을 보냄.
- 서비스는 내부적으로 파드2의 변경된 IP를 추적하여 요청을 올바르게 전달.
- 엔드포인트(Endpoints) 관리
- 서비스는 부하분산 장비(Layer 4 Switch)처럼 동작
- 서비스에 연결된 파드들의 엔드포인트 목록을 자동으로 갱신
- 파드2가 재시작되어 IP가 172.16.1.3으로 변경되더라도 서비스가 이를 감지하여 자동으로 연결 수정
☞ [참고링크] K8S 서비스 소개 : kube-proxy 모드 - iptables, ipvs, nftables, eBPF - 링크 , Finda , 커피고래
서비스 종류
- ClusterIP 타입

- NodePort 타입

- LoadBalancer 타입 (기본 모드) : NLB 인스턴스 유형 ⇒ 노드IP:노드포트

- Cloud Controller Manager 를 통해 K8S NodePort 정보를 사용하는 CLB/NLB 프로비저닝


Service (LoadBalancer Controller) : AWS Load Balancer Controller + NLB (파드) IP 모드 동작 with AWS VPC CNI


☞ Cluster IP 통신 상세 분석 : 원고 중 일부 참조
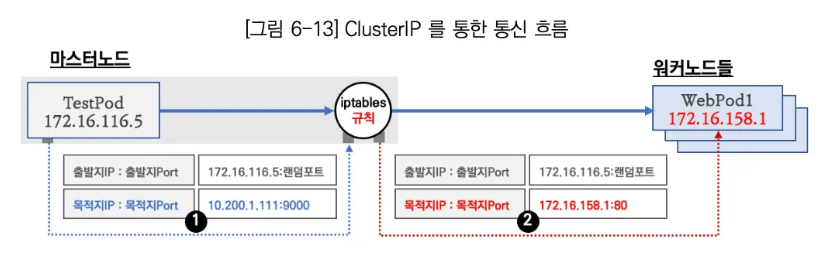
- TestPod (172.16.116.5, 마스터 노드)에서 ClusterIP (10.200.1.111:9000)로 요청 전송
- TestPod가 10.200.1.111:9000으로 요청을 보냄 (ClusterIP는 가상의 IP)
- iptables 규칙에 의해 ClusterIP → 실제 Pod IP 변환
- Kubernetes는 iptables 규칙을 이용해 ClusterIP를 실제 Pod IP로 변환
- 10.200.1.111:9000 → 172.16.158.1:80 (실제 WebPod1의 IP와 포트로 변경)
- 변경된 요청이 WebPod1 (172.16.158.1:80)으로 전달
- TestPod는 ClusterIP로 요청했지만, 실제 요청은 WebPod1로 전송됨.
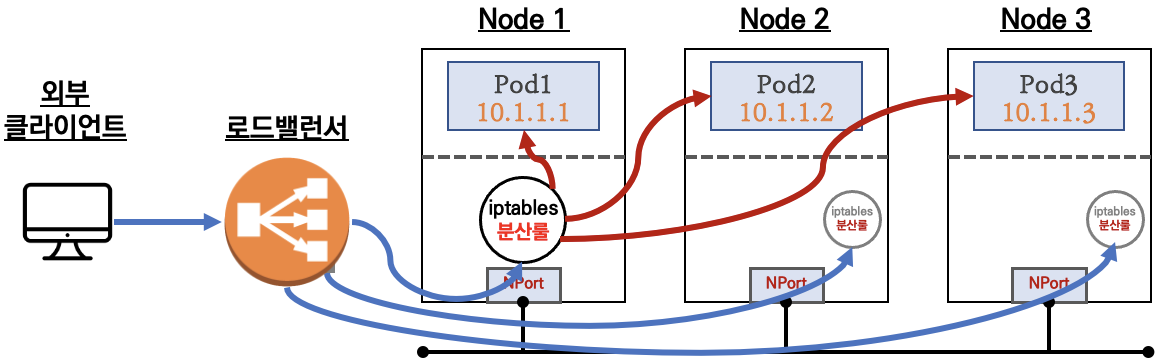
☞ iptables 정책 적용 순서 : PREROUTING → KUBE-SERVICES → KUBE-SVC-### → KUBE-SEP-#<파드1> , KUBE-SEP-#<파드2> , KUBE-SEP-#<파드3>


- 결론 : 내부에서 클러스터 IP로 접속 시, PREROUTE(nat) 에서 DNAT(3개 파드) 되고, POSTROUTE(nat) 에서 SNAT 되지 않고 나간다!


# 컨트롤플레인에서 확인 : 너무 복잡해서 리턴 트래픽에 대해서는 상세히 분석 정리하지 않습니다.
docker exec -it myk8s-control-plane bash
----------------------------------------

# iptables 확인
iptables -t filter -S
iptables -t nat -S
iptables -t nat -S | wc -l
iptables -t mangle -S

# iptables 상세 확인 - 매칭 패킷 카운트, 인터페이스 정보 등 포함
iptables -nvL -t filter
iptables -nvL -t nat
iptables -nvL -t mangle

# rule 갯수 확인
iptables -nvL -t filter | wc -l
iptables -nvL -t nat | wc -l

# 규칙 패킷 바이트 카운트 초기화
iptables -t filter --zero; iptables -t nat --zero; iptables -t mangle --zero

# 정책 확인 : 아래 정책 내용은 핵심적인 룰(rule)만 표시했습니다!
iptables -t nat -nvL

iptables -v --numeric --table nat --list PREROUTING | column -t
Chain PREROUTING (policy ACCEPT 0 packets, 0 bytes)
 pkts bytes target     prot opt in     out     source               destination
  778 46758 KUBE-SERVICES  all  --  *      *       0.0.0.0/0            0.0.0.0/0            /* kubernetes service portals */

iptables -v --numeric --table nat --list KUBE-SERVICES | column
# 바로 아래 룰(rule)에 의해서 서비스(ClusterIP)를 인지하고 처리를 합니다
Chain KUBE-SERVICES (2 references)
 pkts bytes target                     prot opt in     out     source               destination
   92  5520 KUBE-SVC-KBDEBIL6IU6WL7RF  tcp  --  *      *       0.0.0.0/0            10.105.114.73        /* default/svc-clusterip:svc-webport cluster IP */ tcp dpt:9000

iptables -v --numeric --table nat --list KUBE-SVC-KBDEBIL6IU6WL7RF | column
watch -d 'iptables -v --numeric --table nat --list KUBE-SVC-KBDEBIL6IU6WL7RF'

SVC1=$(kubectl get svc svc-clusterip -o jsonpath={.spec.clusterIP})
kubectl exec -it net-pod -- zsh -c "for i in {1..100};   do curl -s $SVC1:9000 | grep Hostname; sleep 1; done"

# SVC-### 에서 랜덤 확률(대략 33%)로 SEP(Service EndPoint)인 각각 파드 IP로 DNAT 됩니다!
## 첫번째 룰에 일치 확률은 33% 이고, 매칭되지 않을 경우 아래 2개 남을때는 룰 일치 확률은 50%가 됩니다. 이것도 매칭되지 않으면 마지막 룰로 100% 일치됩니다
Chain KUBE-SVC-KBDEBIL6IU6WL7RF (1 references)
 pkts bytes target                     prot opt in     out     source               destination
   38  2280 KUBE-SEP-6TM74ZFOWZXXYQW6  all  --  *      *       0.0.0.0/0            0.0.0.0/0            /* default/svc-clusterip:svc-webport */ statistic mode random probability 0.33333333349
   29  1740 KUBE-SEP-354QUAZJTL5AR6RR  all  --  *      *       0.0.0.0/0            0.0.0.0/0            /* default/svc-clusterip:svc-webport */ statistic mode random probability 0.50000000000
   25  1500 KUBE-SEP-PY4VJNJPBUZ3ATEL  all  --  *      *       0.0.0.0/0            0.0.0.0/0            /* default/svc-clusterip:svc-webport */

iptables -v --numeric --table nat --list KUBE-SEP-<각자 값 입력>
Chain KUBE-SEP-6TM74ZFOWZXXYQW6 (1 references)
 pkts bytes target     prot opt in     out     source               destination
   38  2280 DNAT       tcp  --  *      *       0.0.0.0/0            0.0.0.0/0            /* default/svc-clusterip:svc-webport */ tcp to:172.16.158.3:80

iptables -v --numeric --table nat --list KUBE-SEP-354QUAZJTL5AR6RR | column -t
Chain KUBE-SEP-6TM74ZFOWZXXYQW6 (1 references)
 pkts bytes target     prot opt in     out     source               destination
   29  1500 DNAT       tcp  --  *      *       0.0.0.0/0            0.0.0.0/0            /* default/svc-clusterip:svc-webport */ tcp to:172.16.184.3:80

iptables -v --numeric --table nat --list KUBE-SEP-PY4VJNJPBUZ3ATEL | column -t
Chain KUBE-SEP-6TM74ZFOWZXXYQW6 (1 references)
 pkts bytes target     prot opt in     out     source               destination
   25  1740 DNAT       tcp  --  *      *       0.0.0.0/0            0.0.0.0/0            /* default/svc-clusterip:svc-webport */ tcp to:172.16.34.3:80

iptables -t nat --zero
iptables -v --numeric --table nat --list POSTROUTING | column; echo ; iptables -v --numeric --table nat --list KUBE-POSTROUTING | column
watch -d 'iptables -v --numeric --table nat --list POSTROUTING; echo ; iptables -v --numeric --table nat --list KUBE-POSTROUTING'
# POSTROUTE(nat) : 0x4000(2진수로 0100 0000 0000 0000, 10진수 16384) 마킹 되어 있지 않으니 RETURN 되고 그냥 빠져나가서 SNAT 되지 않는다!
Chain KUBE-POSTROUTING (1 references)
 pkts bytes target     prot opt in     out     source               destination
  572 35232 RETURN     all  --  *      *       0.0.0.0/0            0.0.0.0/0            mark match ! 0x4000/0x4000
    0     0 MARK       all  --  *      *       0.0.0.0/0            0.0.0.0/0            MARK xor 0x4000
    0     0 MASQUERADE  all  --  *      *       0.0.0.0/0            0.0.0.0/0            /* kubernetes service traffic requiring SNAT */ random-fully

iptables -t nat -S | grep KUBE-POSTROUTING
-A KUBE-POSTROUTING -m mark ! --mark 0x4000/0x4000 -j RETURN
-A KUBE-POSTROUTING -j MARK --set-xmark 0x4000/0x0
-A KUBE-POSTROUTING -m comment --comment "kubernetes service traffic requiring SNAT" -j MASQUERADE --random-fully
...

exit
----------------------------------------

# 위 서비스 생성 시 kube-proxy 에 의해서 iptables 규칙이 모든 노드에 추가됨을 한번 더 확이
docker exec -it myk8s-control-plane iptables -v --numeric --table nat --list KUBE-SVC-KBDEBIL6IU6WL7RF
...

for i in control-plane worker worker2 worker3; do echo ">> node myk8s-$i <<"; docker exec -it myk8s-$i iptables -v --numeric --table nat --list KUBE-SVC-KBDEBIL6IU6WL7RF; echo; done
...
☞ 참고: Optimizing iptables mode performance - Docs
☞ NLB 모드 전체 정리
1. 인스턴스 유형 : 노드에 NodePort로 전달

- externalTrafficPolicy : ClusterIP ⇒ 2번 분산 및 SNAT으로 Client IP 확인 불가능 ← LoadBalancer 타입 (기본 모드) 동작
- externalTrafficPolicy : Local ⇒ 1번 분산 및 ClientIP 유지, 워커 노드의 iptables 사용함
2. IP 유형 ⇒ 반드시 AWS LoadBalancer 컨트롤러 파드 및 정책 설정이 필요함!

- Proxy Protocol v2 비활성화 ⇒ NLB에서 바로 파드로 인입, 단 ClientIP가 NLB로 SNAT 되어 Client IP 확인 불가능
- Proxy Protocol v2 활성화 ⇒ NLB에서 바로 파드로 인입 및 ClientIP 확인 가능(→ 단 PPv2 를 애플리케이션이 인지할 수 있게 설정 필요)
☞ AWS LoadBalancer Controller 배포 - Link
# 설치 전 CRD 확인
kubectl get crd

# Helm Chart 설치
helm repo add eks https://aws.github.io/eks-charts
helm repo update
helm install aws-load-balancer-controller eks/aws-load-balancer-controller -n kube-system --set clusterName=$CLUSTER_NAME


## 설치 확인
kubectl get crd
kubectl explain ingressclassparams.elbv2.k8s.aws
kubectl explain targetgroupbindings.elbv2.k8s.aws

kubectl get deployment -n kube-system aws-load-balancer-controller
kubectl describe deploy -n kube-system aws-load-balancer-controller
kubectl describe deploy -n kube-system aws-load-balancer-controller | grep 'Service Account'
  Service Account:  aws-load-balancer-controller

# 클러스터롤, 롤 확인
kubectl describe clusterrolebindings.rbac.authorization.k8s.io aws-load-balancer-controller-rolebinding
kubectl describe clusterroles.rbac.authorization.k8s.io aws-load-balancer-controller-role
...
PolicyRule:
  Resources                                     Non-Resource URLs  Resource Names  Verbs
  ---------                                     -----------------  --------------  -----
  targetgroupbindings.elbv2.k8s.aws             []                 []              [create delete get list patch update watch]
  events                                        []                 []              [create patch]
  ingresses                                     []                 []              [get list patch update watch]
  services                                      []                 []              [get list patch update watch]
  ingresses.extensions                          []                 []              [get list patch update watch]
  services.extensions                           []                 []              [get list patch update watch]
  ingresses.networking.k8s.io                   []                 []              [get list patch update watch]
  services.networking.k8s.io                    []                 []              [get list patch update watch]
  endpoints                                     []                 []              [get list watch]
  namespaces                                    []                 []              [get list watch]
  nodes                                         []                 []              [get list watch]
  pods                                          []                 []              [get list watch]
  endpointslices.discovery.k8s.io               []                 []              [get list watch]
  ingressclassparams.elbv2.k8s.aws              []                 []              [get list watch]
  ingressclasses.networking.k8s.io              []                 []              [get list watch]
  ingresses/status                              []                 []              [update patch]
  pods/status                                   []                 []              [update patch]
  services/status                               []                 []              [update patch]
  targetgroupbindings/status                    []                 []              [update patch]
  ingresses.elbv2.k8s.aws/status                []                 []              [update patch]
  pods.elbv2.k8s.aws/status                     []                 []              [update patch]
  services.elbv2.k8s.aws/status                 []                 []              [update patch]
  targetgroupbindings.elbv2.k8s.aws/status      []                 []              [update patch]
  ingresses.extensions/status                   []                 []              [update patch]
  pods.extensions/status                        []                 []              [update patch]
  services.extensions/status                    []                 []              [update patch]
  targetgroupbindings.extensions/status         []                 []              [update patch]
  ingresses.networking.k8s.io/status            []                 []              [update patch]
  pods.networking.k8s.io/status                 []                 []              [update patch]
  services.networking.k8s.io/status             []                 []              [update patch]
  targetgroupbindings.networking.k8s.io/status  []                 []              [update patch]

☞ 서비스/파드 배포 테스트 with NLB - Docs , NLB
- Network Load Balancer - AWS Load Balancer Controller : NLB 보안그룹 지원에 따른 기본 설정 내용 참고
# 모니터링
watch -d kubectl get pod,svc,ep,endpointslices

# 디플로이먼트 & 서비스 생성
cat << EOF > echo-service-nlb.yaml
apiVersion: apps/v1
kind: Deployment
metadata:
  name: deploy-echo
spec:
  replicas: 2
  selector:
    matchLabels:
      app: deploy-websrv
  template:
    metadata:
      labels:
        app: deploy-websrv
    spec:
      terminationGracePeriodSeconds: 0
      containers:
      - name: aews-websrv
        image: k8s.gcr.io/echoserver:1.5
        ports:
        - containerPort: 8080
---
apiVersion: v1
kind: Service
metadata:
  name: svc-nlb-ip-type
  annotations:
    service.beta.kubernetes.io/aws-load-balancer-nlb-target-type: ip
    service.beta.kubernetes.io/aws-load-balancer-scheme: internet-facing
    service.beta.kubernetes.io/aws-load-balancer-healthcheck-port: "8080"
    service.beta.kubernetes.io/aws-load-balancer-cross-zone-load-balancing-enabled: "true"
spec:
  ports:
    - port: 80
      targetPort: 8080
      protocol: TCP
  type: LoadBalancer
  loadBalancerClass: service.k8s.aws/nlb
  selector:
    app: deploy-websrv
EOF
kubectl apply -f echo-service-nlb.yaml


# 확인
aws elbv2 describe-load-balancers --query 'LoadBalancers[*].State.Code' --output text
kubectl get deploy,pod
kubectl get svc,ep,ingressclassparams,targetgroupbindings
kubectl get targetgroupbindings -o json | jq

# AWS 관리콘솔에서 NLB 정보 확인
# 빠른 실습을 위해서 등록 취소 지연(드레이닝 간격) 수정 : 기본값 300초
echo-service-nlb.yaml 파일 IDE(VS code)에서 수정
..
apiVersion: v1
kind: Service
metadata:
  name: svc-nlb-ip-type
  annotations:
    service.beta.kubernetes.io/aws-load-balancer-nlb-target-type: ip
    service.beta.kubernetes.io/aws-load-balancer-scheme: internet-facing
    service.beta.kubernetes.io/aws-load-balancer-healthcheck-port: "8080"
    service.beta.kubernetes.io/aws-load-balancer-cross-zone-load-balancing-enabled: "true"
    service.beta.kubernetes.io/aws-load-balancer-target-group-attributes: deregistration_delay.timeout_seconds=60
...
kubectl apply -f echo-service-nlb.yaml

# AWS ELB(NLB) 정보 확인
aws elbv2 describe-load-balancers | jq
aws elbv2 describe-load-balancers --query 'LoadBalancers[*].State.Code' --output text
ALB_ARN=$(aws elbv2 describe-load-balancers --query 'LoadBalancers[?contains(LoadBalancerName, `k8s-default-svcnlbip`) == `true`].LoadBalancerArn' | jq -r '.[0]')
aws elbv2 describe-target-groups --load-balancer-arn $ALB_ARN | jq
TARGET_GROUP_ARN=$(aws elbv2 describe-target-groups --load-balancer-arn $ALB_ARN | jq -r '.TargetGroups[0].TargetGroupArn')
aws elbv2 describe-target-health --target-group-arn $TARGET_GROUP_ARN | jq
{
  "TargetHealthDescriptions": [
    {
      "Target": {
        "Id": "192.168.2.153",
        "Port": 8080,
        "AvailabilityZone": "ap-northeast-2b"
      },
      "HealthCheckPort": "8080",
      "TargetHealth": {
        "State": "initial",
        "Reason": "Elb.RegistrationInProgress",
        "Description": "Target registration is in progress"
      }
    },
...

# 웹 접속 주소 확인
kubectl get svc svc-nlb-ip-type -o jsonpath='{.status.loadBalancer.ingress[0].hostname}' | awk '{ print "Pod Web URL = http://"$1 }'

# 파드 로깅 모니터링
kubectl logs -l app=deploy-websrv -f
kubectl stern -l  app=deploy-websrv

# 분산 접속 확인
NLB=$(kubectl get svc svc-nlb-ip-type -o jsonpath='{.status.loadBalancer.ingress[0].hostname}')
curl -s $NLB
for i in {1..100}; do curl -s $NLB | grep Hostname ; done | sort | uniq -c | sort -nr
  52 Hostname: deploy-echo-55456fc798-2w65p
  48 Hostname: deploy-echo-55456fc798-cxl7z

# 지속적인 접속 시도 : 아래 상세 동작 확인 시 유용(패킷 덤프 등)
while true; do curl -s --connect-timeout 1 $NLB | egrep 'Hostname|client_address'; echo "----------" ; date "+%Y-%m-%d %H:%M:%S" ; sleep 1; done


- AWS NLB의 대상 그룹 확인 : IP를 확인해보자

- 파드 2개 → 1개 → 3개 설정 시 동작 : auto discovery ← 어떻게 가능할까?
# (신규 터미널) 모니터링
while true; do aws elbv2 describe-target-health --target-group-arn $TARGET_GROUP_ARN --output text; echo; done

# 작업용 EC2 - 파드 1개 설정
kubectl scale deployment deploy-echo --replicas=1

# 확인
kubectl get deploy,pod,svc,ep
NLB=$(kubectl get svc svc-nlb-ip-type -o jsonpath='{.status.loadBalancer.ingress[0].hostname}')
curl -s $NLB
for i in {1..100}; do curl -s --connect-timeout 1 $NLB | grep Hostname ; done | sort | uniq -c | sort -nr

# 파드 3개 설정
kubectl scale deployment deploy-echo --replicas=3

# 확인 : NLB 대상 타켓이 아직 initial 일 때 100번 반복 접속 시 어떻게 되는지 확인해보자!
kubectl get deploy,pod,svc,ep
NLB=$(kubectl get svc svc-nlb-ip-type -o jsonpath='{.status.loadBalancer.ingress[0].hostname}')
curl -s $NLB
for i in {1..100}; do curl -s --connect-timeout 1 $NLB | grep Hostname ; done | sort | uniq -c | sort -nr

#
kubectl describe deploy -n kube-system aws-load-balancer-controller | grep -i 'Service Account'
  Service Account:  aws-load-balancer-controller

# [AWS LB Ctrl] 클러스터 롤 바인딩 정보 확인
kubectl describe clusterrolebindings.rbac.authorization.k8s.io aws-load-balancer-controller-rolebinding

# [AWS LB Ctrl] 클러스터롤 확인
kubectl describe clusterroles.rbac.authorization.k8s.io aws-load-balancer-controller-role


- 실습 리소스 삭제: kubectl delete deploy deploy-echo; kubectl delete svc svc-nlb-ip-type
☞ LB IP Target & Proxy Protocol v2(PPv2) 활성화 : NLB에서 바로 파드로 인입 및 ClientIP 확인 설정 - 링크 image 참고

# 생성
cat <<EOF | kubectl apply -f -
apiVersion: apps/v1
kind: Deployment
metadata:
  name: gasida-web
spec:
  replicas: 1
  selector:
    matchLabels:
      app: gasida-web
  template:
    metadata:
      labels:
        app: gasida-web
    spec:
      terminationGracePeriodSeconds: 0
      containers:
      - name: gasida-web
        image: gasida/httpd:pp
        ports:
        - containerPort: 80
---
apiVersion: v1
kind: Service
metadata:
  name: svc-nlb-ip-type-pp
  annotations:
    service.beta.kubernetes.io/aws-load-balancer-nlb-target-type: ip
    service.beta.kubernetes.io/aws-load-balancer-scheme: internet-facing
    service.beta.kubernetes.io/aws-load-balancer-cross-zone-load-balancing-enabled: "true"
    service.beta.kubernetes.io/aws-load-balancer-proxy-protocol: "*"
spec:
  ports:
    - port: 80
      targetPort: 80
      protocol: TCP
  type: LoadBalancer
  loadBalancerClass: service.k8s.aws/nlb
  selector:
    app: gasida-web
EOF

# 확인
kubectl get svc,ep
kubectl describe svc svc-nlb-ip-type-pp
kubectl describe svc svc-nlb-ip-type-pp | grep Annotations: -A5

# apache에 proxy protocol 활성화 확인
kubectl exec deploy/gasida-web -- apachectl -t -D DUMP_MODULES
kubectl exec deploy/gasida-web -- cat /usr/local/apache2/conf/httpd.conf

# 접속 확인
NLB=$(kubectl get svc svc-nlb-ip-type-pp -o jsonpath={.status.loadBalancer.ingress[0].hostname})
curl -s $NLB

# 지속적인 접속 시도 : 아래 상세 동작 확인 시 유용(패킷 덤프 등)
while true; do curl -s --connect-timeout 1 $NLB; echo "----------" ; date "+%Y-%m-%d %H:%M:%S" ; sleep 1; done

# 로그 확인
kubectl logs -l app=gasida-web -f

# 삭제
kubectl delete deploy gasida-web; kubectl delete svc svc-nlb-ip-type-pp
7. Ingress
인그레스 소개 : 클러스터 내부의 서비스(ClusterIP, NodePort, Loadbalancer)를 외부로 노출(HTTP/HTTPS) - Web Proxy 역할
AWS Load Balancer Controller + Ingress (ALB) IP 모드 동작 with AWS VPC CNI

☞ 서비스/파드 배포 테스트 with Ingress(ALB) - ALB
# 게임 파드와 Service, Ingress 배포
cat <<EOF | kubectl apply -f -
apiVersion: v1
kind: Namespace
metadata:
  name: game-2048
---
apiVersion: apps/v1
kind: Deployment
metadata:
  namespace: game-2048
  name: deployment-2048
spec:
  selector:
    matchLabels:
      app.kubernetes.io/name: app-2048
  replicas: 2
  template:
    metadata:
      labels:
        app.kubernetes.io/name: app-2048
    spec:
      containers:
      - image: public.ecr.aws/l6m2t8p7/docker-2048:latest
        imagePullPolicy: Always
        name: app-2048
        ports:
        - containerPort: 80
---
apiVersion: v1
kind: Service
metadata:
  namespace: game-2048
  name: service-2048
spec:
  ports:
    - port: 80
      targetPort: 80
      protocol: TCP
  type: NodePort
  selector:
    app.kubernetes.io/name: app-2048
---
apiVersion: networking.k8s.io/v1
kind: Ingress
metadata:
  namespace: game-2048
  name: ingress-2048
  annotations:
    alb.ingress.kubernetes.io/scheme: internet-facing
    alb.ingress.kubernetes.io/target-type: ip
spec:
  ingressClassName: alb
  rules:
    - http:
        paths:
        - path: /
          pathType: Prefix
          backend:
            service:
              name: service-2048
              port:
                number: 80
EOF

# 모니터링
watch -d kubectl get pod,ingress,svc,ep,endpointslices -n game-2048

# 생성 확인
kubectl get ingress,svc,ep,pod -n game-2048
kubectl get-all -n game-2048
kubectl get targetgroupbindings -n game-2048

# ALB 생성 확인
aws elbv2 describe-load-balancers --query 'LoadBalancers[?contains(LoadBalancerName, `k8s-game2048`) == `true`]' | jq
ALB_ARN=$(aws elbv2 describe-load-balancers --query 'LoadBalancers[?contains(LoadBalancerName, `k8s-game2048`) == `true`].LoadBalancerArn' | jq -r '.[0]')
aws elbv2 describe-target-groups --load-balancer-arn $ALB_ARN
TARGET_GROUP_ARN=$(aws elbv2 describe-target-groups --load-balancer-arn $ALB_ARN | jq -r '.TargetGroups[0].TargetGroupArn')
aws elbv2 describe-target-health --target-group-arn $TARGET_GROUP_ARN | jq

# Ingress 확인
kubectl describe ingress -n game-2048 ingress-2048
kubectl get ingress -n game-2048 ingress-2048 -o jsonpath="{.status.loadBalancer.ingress[*].hostname}{'\n'}"

# 게임 접속 : ALB 주소로 웹 접속
kubectl get ingress -n game-2048 ingress-2048 -o jsonpath='{.status.loadBalancer.ingress[0].hostname}' | awk '{ print "Game URL = http://"$1 }'

# 파드 IP 확인
kubectl get pod -n game-2048 -owide


- ALB 대상 그룹에 등록된 대상 확인 : ALB에서 파드 IP로 직접 전달


- 파드 3개로 증가
# 터미널1
watch kubectl get pod -n game-2048
while true; do aws elbv2 describe-target-health --target-group-arn $TARGET_GROUP_ARN --output text; echo; done

# 터미널2 : 파드 3개로 증가
kubectl scale deployment -n game-2048 deployment-2048 --replicas 3- 파드 1개로 감소
# 터미널2 : 파드 1개로 감소
kubectl scale deployment -n game-2048 deployment-2048 --replicas 1
- 실습 리소스 삭제
kubectl delete ingress ingress-2048 -n game-2048
kubectl delete svc service-2048 -n game-2048 && kubectl delete deploy deployment-2048 -n game-2048 && kubectl delete ns game-2048
☞ [참고] Exposing Kubernetes Applications, Part 1: Service and Ingress Resources - 링크
☞ (참고) Target Groups CRD를 분리 사용하여, EKS 업그레이드에 활용하기 (aws 참고)


- Ingress를 제거하고 별도로 ALB를 구성 후 파드를 TargetGroupBinding으로 직접 연결
- ALB가 Kubernetes와 독립적으로 구성되니 Route 53이나 CloudFront나 WAF에 대한 조정이 필요 없음!!!

- Ingress 구성이 아닌 TargetGroupBinding으로 생성된 ALB로 지정해서 서비스
- 두개의 클러스터의 자원 모두 기존에 생성한 ALB를 활용
- Terraform을 통해 ALB 관련 자원을 생성하고 제어
- ALB의 Target Group을 클러스터 별로 분리해서 사용
- ALB Listener에 2개의 Target Group을 등록하고 Weight를 조정해서 사용
- (일반적인 서비스) v1 TG 50% : v2 TG 50%
- (v1 클러스터 업그레이드 전) v1 TG 0% : v2 TG 100% ⇒ v1 클러스터 업그레이드 진행
- (v2 클러스터 업그레이드 전) v1 TG 100% : v2 TG 0% ⇒ v2 클러스터 업그레이드 진행
- (두 클러스터 모두 업그레이드 완료) v1 TG 50% : v2 TG 50%
- ALB Listener에 2개의 Target Group을 등록하고 Weight를 조정해서 사용
- 두개의 클러스터의 자원 모두 기존에 생성한 ALB를 활용
8. ExternalDNS
소개 : K8S 서비스/인그레스 생성 시 도메인을 설정하면, AWS(Route 53), Azure(DNS), GCP(Cloud DNS) 에 A 레코드(TXT 레코드)로 자동 생성/삭제

- ExternalDNS CTRL 권한 주는 방법 3가지 : Node IAM Role, Static credentials, IRSA
☞ AWS Route 53 정보 확인 & 변수 지정 : Public 도메인 소유를 하고 계셔야 합니다!
# 자신의 도메인 변수 지정 : 소유하고 있는 자신의 도메인을 입력하시면 됩니다
MyDomain=<자신의 도메인>
MyDomain=sspp30.shop

# 자신의 Route 53 도메인 ID 조회 및 변수 지정
aws route53 list-hosted-zones-by-name --dns-name "${MyDomain}." | jq
aws route53 list-hosted-zones-by-name --dns-name "${MyDomain}." --query "HostedZones[0].Name"
aws route53 list-hosted-zones-by-name --dns-name "${MyDomain}." --query "HostedZones[0].Id" --output text
MyDnzHostedZoneId=`aws route53 list-hosted-zones-by-name --dns-name "${MyDomain}." --query "HostedZones[0].Id" --output text`
echo $MyDnzHostedZoneId

# (옵션) NS 레코드 타입 첫번째 조회
aws route53 list-resource-record-sets --output json --hosted-zone-id "${MyDnzHostedZoneId}" --query "ResourceRecordSets[?Type == 'NS']" | jq -r '.[0].ResourceRecords[].Value'
# (옵션) A 레코드 타입 모두 조회
aws route53 list-resource-record-sets --output json --hosted-zone-id "${MyDnzHostedZoneId}" --query "ResourceRecordSets[?Type == 'A']"

# A 레코드 타입 조회
aws route53 list-resource-record-sets --hosted-zone-id "${MyDnzHostedZoneId}" --query "ResourceRecordSets[?Type == 'A']" | jq
aws route53 list-resource-record-sets --hosted-zone-id "${MyDnzHostedZoneId}" --query "ResourceRecordSets[?Type == 'A'].Name" | jq
aws route53 list-resource-record-sets --hosted-zone-id "${MyDnzHostedZoneId}" --query "ResourceRecordSets[?Type == 'A'].Name" --output text

# A 레코드 값 반복 조회
while true; do aws route53 list-resource-record-sets --hosted-zone-id "${MyDnzHostedZoneId}" --query "ResourceRecordSets[?Type == 'A']" | jq ; date ; echo ; sleep 1; done
☞ ExternalDNS 설치 - 링크
# EKS 배포 시 Node IAM Role 설정되어 있음
# eksctl create cluster ... --external-dns-access ...

#
MyDomain=<자신의 도메인>
MyDomain=sspp30.shop

# 자신의 Route 53 도메인 ID 조회 및 변수 지정
MyDnzHostedZoneId=$(aws route53 list-hosted-zones-by-name --dns-name "${MyDomain}." --query "HostedZones[0].Id" --output text)

# 변수 확인
echo $MyDomain, $MyDnzHostedZoneId

# ExternalDNS 배포
curl -s -O https://raw.githubusercontent.com/gasida/PKOS/main/aews/externaldns.yaml
cat externaldns.yaml
MyDomain=$MyDomain MyDnzHostedZoneId=$MyDnzHostedZoneId envsubst < externaldns.yaml | kubectl apply -f -

# 확인 및 로그 모니터링
kubectl get pod -l app.kubernetes.io/name=external-dns -n kube-system
kubectl logs deploy/external-dns -n kube-system -f
- (참고) 기존에 ExternalDNS를 통해 사용한 A/TXT 레코드가 있는 존의 경우에 policy 정책을 upsert-only 로 설정 후 사용 하자 - Link
- #--policy=upsert-only # would prevent ExternalDNS from deleting any records, omit to enable full synchronization
☞ Service(NLB) + 도메인 연동(ExternalDNS) - 도메인체크
# 터미널1 (모니터링)
watch -d 'kubectl get pod,svc'
kubectl logs deploy/external-dns -n kube-system -f
혹은
kubectl stern -l app.kubernetes.io/name=external-dns -n kube-system

# 테트리스 디플로이먼트 배포
cat <<EOF | kubectl apply -f -
apiVersion: apps/v1
kind: Deployment
metadata:
  name: tetris
  labels:
    app: tetris
spec:
  replicas: 1
  selector:
    matchLabels:
      app: tetris
  template:
    metadata:
      labels:
        app: tetris
    spec:
      containers:
      - name: tetris
        image: bsord/tetris
---
apiVersion: v1
kind: Service
metadata:
  name: tetris
  annotations:
    service.beta.kubernetes.io/aws-load-balancer-nlb-target-type: ip
    service.beta.kubernetes.io/aws-load-balancer-scheme: internet-facing
    service.beta.kubernetes.io/aws-load-balancer-cross-zone-load-balancing-enabled: "true"
    service.beta.kubernetes.io/aws-load-balancer-backend-protocol: "http"
    #service.beta.kubernetes.io/aws-load-balancer-healthcheck-port: "80"
spec:
  selector:
    app: tetris
  ports:
  - port: 80
    protocol: TCP
    targetPort: 80
  type: LoadBalancer
  loadBalancerClass: service.k8s.aws/nlb
EOF

# 배포 확인
kubectl get deploy,svc,ep tetris

# NLB에 ExternanDNS 로 도메인 연결
kubectl annotate service tetris "external-dns.alpha.kubernetes.io/hostname=tetris.$MyDomain"
while true; do aws route53 list-resource-record-sets --hosted-zone-id "${MyDnzHostedZoneId}" --query "ResourceRecordSets[?Type == 'A']" | jq ; date ; echo ; sleep 1; done

# Route53에 A레코드 확인
aws route53 list-resource-record-sets --hosted-zone-id "${MyDnzHostedZoneId}" --query "ResourceRecordSets[?Type == 'A']" | jq

# 확인
dig +short tetris.$MyDomain @8.8.8.8
dig +short tetris.$MyDomain

# 도메인 체크
echo -e "My Domain Checker Site1 = https://www.whatsmydns.net/#A/tetris.$MyDomain"
echo -e "My Domain Checker Site2 = https://dnschecker.org/#A/tetris.$MyDomain"

# 웹 접속 주소 확인 및 접속
echo -e "Tetris Game URL = http://tetris.$MyDomain"


- 웹 접속(http) → 화살표키, 일시중지(space bar)

- 리소스 삭제 : kubectl delete deploy,svc tetris ← 삭제 시 externaldns 에 의해서 A레코드도 같이 삭제됨
☞ (참고) ACM 퍼블릭 인증서 요청 및 해당 인증서에 대한 Route53 도메인 검증 설정 with AWS CLI
# 각자 자신의 도메인 변수 지정
MyDomain=<각자 자신의 도메인>

# ACM 퍼블릭 인증서 요청
CERT_ARN=$(aws acm request-certificate \
--domain-name $MyDomain \
--validation-method 'DNS' \
--key-algorithm 'RSA_2048' \
|jq --raw-output '.CertificateArn')

# 생성한 인증서 CNAME 이름 가져오기
CnameName=$(aws acm describe-certificate \
--certificate-arn $CERT_ARN \
--query 'Certificate.DomainValidationOptions[*].ResourceRecord.Name' \
--output text)

# 생성한 인증서 CNAME 값 가져오기
CnameValue=$(aws acm describe-certificate \
--certificate-arn $CERT_ARN \
--query 'Certificate.DomainValidationOptions[*].ResourceRecord.Value' \
--output text)

# 정상 출력 확인하기
echo $CERT_ARN, $CnameName, $CnameValue

# 레코드 파일
cat <<EOT > cname.json
{
  "Comment": "create a acm's CNAME record",
  "Changes": [
    {
      "Action": "CREATE",
      "ResourceRecordSet": {
        "Name": "CnameName",
        "Type": "CNAME",
        "TTL": 300,
        "ResourceRecords": [
          {
            "Value": "CnameValue"
          }
        ]
      }
    }
  ]
}
EOT

# CNAME 이름, 값 치환하기
sed -i "s/CnameName/$CnameName/g" cname.json
sed -i "s/CnameValue/$CnameValue/g" cname.json
cat cname.json

# 해당 인증서에 대한 Route53 도메인 검증 설정을 위한 Route53 레코드 생성
aws route53 change-resource-record-sets --hosted-zone-id $MyDnzHostedZoneId --change-batch file://cname.json
온프레미스 환경의 K8S 에도 external dns 가 회사 내부망 DNS 서버에 레코드를 동적으로 추가/삭제 가능 구성 사례
- 안정성과 유연성을 겸비한 카카오뱅크의 On-premise Kubernetes 구축 여정기 / if(kakaoAI)2024

9. CoreDNS
Kubernetes에서 DNS 다루는 방법 - 도메인을 찾아서
NAVER D2
Kubernetes에서 DNS 다루는 방법 - 도메인을 찾아서
tv.naver.com
Stop Leaking Kubernetes Service Information via DNS! - John Belamaric, Google & Yong Tang, Ivanti
쿠버네티스 DNS 쿼리 Flow - 링크

- Coredns config, 플러그인과 NodeLocal DNS 동작 정리 https://popappend.tistory.com/142
- The following diagram shows application response time with and without DNS caching:
10. Topology Aware Routing
Topology Aware Routing: Understanding the Tradeoffs - Rob Scott, Google
Topology Aware Routing
_Topology Aware Routing_ provides a mechanism to help keep network traffic within the zone where it originated. Preferring same-zone traffic between Pods in your cluster can help with reliability, performance (network latency and throughput), or cost.
kubernetes.io
비용 최적화 - 네트워킹 - Amazon EKS
데이터 전송 요금을 줄이려면 로드 밸런서를 IP 트래픽 모드로 설정하는 것이 좋습니다. 이 설정의 경우 로드 밸런서가 VPC의 모든 서브넷에 배포되었는지 확인하는 것도 중요합니다.
docs.aws.amazon.com
Amazon EKS에서 Topology Aware Hint 기능을 활용하여 Cross-AZ 통신 비용 절감하기 | Amazon Web Services
Amazon EKS로 클러스터 구성 시 일반적으로 고가용성을 위해서 모든 가용 영역(Availability Zone, AZ)에 워커 노드들을 배치합니다. 클러스터에서 실행되는 Pod들 또한 모든 AZ 에 배포되도록 설정하면 높
aws.amazon.com
☞ 테스트를 위한 디플로이먼트와 서비스 배포
# 현재 노드 AZ 배포 확인
kubectl get node --label-columns=topology.kubernetes.io/zone
NAME                                               STATUS   ROLES    AGE   VERSION                ZONE
ip-192-168-1-222.ap-northeast-2.compute.internal   Ready    <none>   16h   v1.31.5-eks-5d632ec   ap-northeast-2a
ip-192-168-2-128.ap-northeast-2.compute.internal   Ready    <none>   16h   v1.31.5-eks-5d632ec   ap-northeast-2b
ip-192-168-3-86.ap-northeast-2.compute.internal    Ready    <none>   16h   v1.31.5-eks-5d632ec   ap-northeast-2c

# 테스트를 위한 디플로이먼트와 서비스 배포
cat <<EOF | kubectl apply -f -
apiVersion: apps/v1
kind: Deployment
metadata:
  name: deploy-echo
spec:
  replicas: 3
  selector:
    matchLabels:
      app: deploy-websrv
  template:
    metadata:
      labels:
        app: deploy-websrv
    spec:
      terminationGracePeriodSeconds: 0
      containers:
      - name: websrv
        image: registry.k8s.io/echoserver:1.5
        ports:
        - containerPort: 8080
---
apiVersion: v1
kind: Service
metadata:
  name: svc-clusterip
spec:
  ports:
    - name: svc-webport
      port: 80
      targetPort: 8080
  selector:
    app: deploy-websrv
  type: ClusterIP
EOF

# 확인
kubectl get deploy,svc,ep,endpointslices
kubectl get pod -owide
kubectl get svc,ep svc-clusterip
kubectl get endpointslices -l kubernetes.io/service-name=svc-clusterip
kubectl get endpointslices -l kubernetes.io/service-name=svc-clusterip -o yaml

# 접속 테스트를 수행할 클라이언트 파드 배포
cat <<EOF | kubectl apply -f -
apiVersion: v1
kind: Pod
metadata:
  name: netshoot-pod
spec:
  containers:
  - name: netshoot-pod
    image: nicolaka/netshoot
    command: ["tail"]
    args: ["-f", "/dev/null"]
  terminationGracePeriodSeconds: 0
EOF

# 확인
kubectl get pod -owide

☞ 테스트 파드(netshoot-pod)에서 ClusterIP 접속 시 부하분산 확인 : AZ(zone) 상관없이 랜덤 확률 부하분산 동작
# 디플로이먼트 파드가 배포된 AZ(zone) 확인
kubectl get pod -l app=deploy-websrv -owide

# 테스트 파드(netshoot-pod)에서 ClusterIP 접속 시 부하분산 확인
kubectl exec -it netshoot-pod -- curl svc-clusterip | grep Hostname
Hostname: deploy-echo-7f67d598dc-h9vst

kubectl exec -it netshoot-pod -- curl svc-clusterip | grep Hostname
Hostname: deploy-echo-7f67d598dc-45trg

# 100번 반복 접속 : 3개의 파드로 AZ(zone) 상관없이 랜덤 확률 부하분산 동작
kubectl exec -it netshoot-pod -- zsh -c "for i in {1..100}; do curl -s svc-clusterip | grep Hostname; done | sort | uniq -c | sort -nr"
  35 Hostname: deploy-echo-7f67d598dc-45trg
  33 Hostname: deploy-echo-7f67d598dc-hg995
  32 Hostname: deploy-echo-7f67d598dc-h9vst
- (심화) IPTables 정책 확인 : ClusterIP는 KUBE-SVC-Y → KUBE-SEP-Z… (3곳) ⇒ 즉, 3개의 파드로 랜덤 확률 부하분산 동작
#
ssh ec2-user@$N1 sudo iptables -t nat -nvL
ssh ec2-user@$N1 sudo iptables -v --numeric --table nat --list PREROUTING
ssh ec2-user@$N1 sudo iptables -v --numeric --table nat --list KUBE-SERVICES
  305 18300 KUBE-SVC-KBDEBIL6IU6WL7RF  tcp  --  *      *       0.0.0.0/0            10.100.155.216       /* default/svc-clusterip:svc-webport cluster IP */ tcp dpt:80
  ...

# 노드1에서 SVC 정책 확인 : SEP(Endpoint) 파드 3개 확인 >> 즉, 3개의 파드로 랜덤 확률 부하분산 동작
ssh ec2-user@$N1 sudo iptables -v --numeric --table nat --list KUBE-SVC-KBDEBIL6IU6WL7RF
Chain KUBE-SVC-KBDEBIL6IU6WL7RF (1 references)
 pkts bytes target     prot opt in     out     source               destination
  108  6480 KUBE-SEP-WC4ARU3RZJKCUD7M  all  --  *      *       0.0.0.0/0            0.0.0.0/0            /* default/svc-clusterip:svc-webport -> 192.168.1.240:8080 */ statistic mode random probability 0.33333333349
  115  6900 KUBE-SEP-3HFAJH523NG6SBCX  all  --  *      *       0.0.0.0/0            0.0.0.0/0            /* default/svc-clusterip:svc-webport -> 192.168.2.36:8080 */ statistic mode random probability 0.50000000000
   82  4920 KUBE-SEP-H37XIVQWZO52OMNP  all  --  *      *       0.0.0.0/0            0.0.0.0/0            /* default/svc-clusterip:svc-webport -> 192.168.3.13:8080 */

# 노드2에서 동일한 SVC 이름 정책 확인 : 상동
ssh ec2-user@$N2 sudo iptables -v --numeric --table nat --list KUBE-SVC-KBDEBIL6IU6WL7RF
(상동)

# 노드3에서 동일한 SVC 이름 정책 확인 : 상동
ssh ec2-user@$N3 sudo iptables -v --numeric --table nat --list KUBE-SVC-KBDEBIL6IU6WL7RF
(상동)

# 3개의 SEP는 각각 개별 파드 접속 정보
ssh ec2-user@$N1 sudo iptables -v --numeric --table nat --list KUBE-SEP-WC4ARU3RZJKCUD7M
Chain KUBE-SEP-WC4ARU3RZJKCUD7M (1 references)
 pkts bytes target     prot opt in     out     source               destination
    0     0 KUBE-MARK-MASQ  all  --  *      *       192.168.1.240        0.0.0.0/0            /* default/svc-clusterip:svc-webport */
  108  6480 DNAT       tcp  --  *      *       0.0.0.0/0            0.0.0.0/0            /* default/svc-clusterip:svc-webport */ tcp to:192.168.1.240:8080

ssh ec2-user@$N1 sudo iptables -v --numeric --table nat --list KUBE-SEP-3HFAJH523NG6SBCX
Chain KUBE-SEP-3HFAJH523NG6SBCX (1 references)
 pkts bytes target     prot opt in     out     source               destination
    0     0 KUBE-MARK-MASQ  all  --  *      *       192.168.2.36         0.0.0.0/0            /* default/svc-clusterip:svc-webport */
  115  6900 DNAT       tcp  --  *      *       0.0.0.0/0            0.0.0.0/0            /* default/svc-clusterip:svc-webport */ tcp to:192.168.2.36:8080

ssh ec2-user@$N1 sudo iptables -v --numeric --table nat --list KUBE-SEP-H37XIVQWZO52OMNP
Chain KUBE-SEP-H37XIVQWZO52OMNP (1 references)
 pkts bytes target     prot opt in     out     source               destination
    0     0 KUBE-MARK-MASQ  all  --  *      *       192.168.3.13         0.0.0.0/0            /* default/svc-clusterip:svc-webport */
   82  4920 DNAT       tcp  --  *      *       0.0.0.0/0            0.0.0.0/0            /* default/svc-clusterip:svc-webport */ tcp to:192.168.3.13:8080
Topology Mode(구 Aware Hint) 설정 후 테스트 파드(netshoot-pod)에서 ClusterIP 접속 시 부하분산 확인 : 같은 AZ(zone)의 목적지 파드로만 접속
- 힌트는 엔드포인트가 트래픽을 제공해야 하는 영역을 설명합니다. 그런 다음 적용된 힌트kube-proxy 에 따라 영역에서 엔드포인트로 트래픽을 라우팅.
- 토폴로지 인식 라우팅(Topology Aware Routing)이 활성화되고 Kubernetes 서비스에 적용되면, EndpointSlice 컨트롤러는 클러스터가 분산된 여러 가용 영역(zones)에 따라 엔드포인트를 비례적으로 할당합니다.kube-proxy는 적용된 힌트를 기반으로 하여, 각 가용 영역 내에서 엔드포인트로 트래픽을 라우팅합니다.
- 이러한 각 엔드포인트에 대해 EndpointSlice 컨트롤러는 해당 엔드포인트가 어떤 가용 영역에서 트래픽을 제공해야 하는지를 나타내는 힌트(hint)를 설정합니다.

# Topology Aware Routing 설정 : 서비스에 annotate에 아래처럼 추가
kubectl annotate service svc-clusterip "service.kubernetes.io/topology-mode=auto"
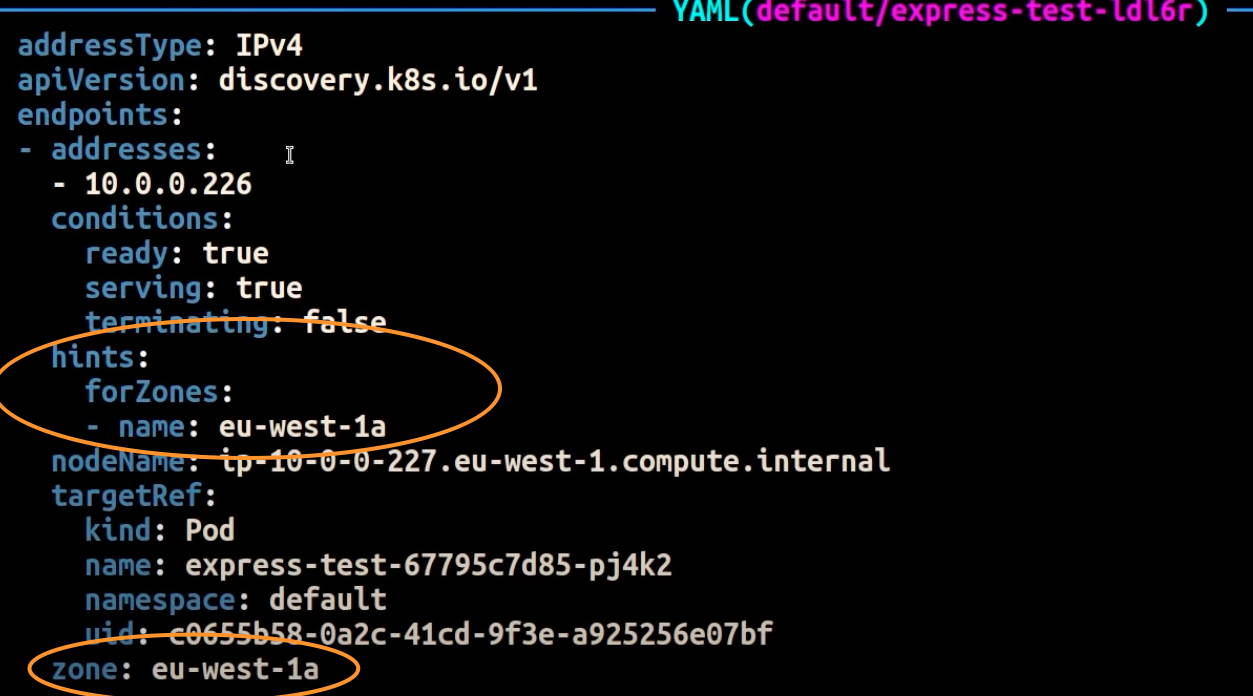
# endpointslices 확인 시, 기존에 없던 hints 가 추가되어 있음 >> 참고로 describe로는 hints 정보가 출력되지 않음
kubectl get endpointslices -l kubernetes.io/service-name=svc-clusterip -o yaml
apiVersion: v1
items:
- addressType: IPv4
apiVersion: discovery.k8s.io/v1
endpoints:
- addresses:
- 192.168.1.172
conditions:
ready: true
serving: true
terminating: false
hints:
forZones:
- name: ap-northeast-2a
nodeName: ip-192-168-1-222.ap-northeast-2.compute.internal
targetRef:
kind: Pod
name: deploy-echo-75b7b9558c-7547k
namespace: default
uid: eda0505a-b319-4d1a-8709-2d85a957bccd
zone: ap-northeast-2a
- addresses:
- 192.168.2.48
conditions:
ready: true
serving: true
terminating: false
hints:
forZones:
- name: ap-northeast-2b
nodeName: ip-192-168-2-128.ap-northeast-2.compute.internal
targetRef:
kind: Pod
name: deploy-echo-75b7b9558c-pkvn9
namespace: default
uid: 690c9f1b-93e0-4b45-b522-2ad86bd78aad
zone: ap-northeast-2b
- addresses:
- 192.168.3.148
conditions:
ready: true
serving: true
terminating: false
hints:
forZones:
- name: ap-northeast-2c
nodeName: ip-192-168-3-86.ap-northeast-2.compute.internal
targetRef:
kind: Pod
name: deploy-echo-75b7b9558c-54pqs
namespace: default
uid: fb4d8f7a-a938-4d61-9fa7-e52f6ea347c2
zone: ap-northeast-2c
kind: EndpointSlice
metadata:
creationTimestamp: "2025-02-15T19:16:15Z"
generateName: svc-clusterip-
generation: 5
labels:
endpointslice.kubernetes.io/managed-by: endpointslice-controller.k8s.io
kubernetes.io/service-name: svc-clusterip
name: svc-clusterip-xqdqf
namespace: default
ownerReferences:
- apiVersion: v1
blockOwnerDeletion: true
controller: true
kind: Service
name: svc-clusterip
uid: c7d5eb18-d9e4-46d7-89f0-5828f6c07bba
resourceVersion: "209048"
uid: c4ff6fb1-b917-4af0-bc3c-c2ba15e25629
ports:
- name: svc-webport
port: 8080
protocol: TCP
kind: List
metadata:
resourceVersion: ""
# 100번 반복 접속 : 테스트 파드(netshoot-pod)와 같은 AZ(zone)의 목적지 파드로만 접속
kubectl exec -it netshoot-pod -- zsh -c "for i in {1..100}; do curl -s svc-clusterip | grep Hostname; done | sort | uniq -c | sort -nr"
100 Hostname: deploy-echo-75b7b9558c-7547k

- (심화) IPTables 정책 확인 : ClusterIP는 KUBE-SVC-Y → KUBE-SEP-Z… (1곳, 해당 노드와 같은 AZ에 배포된 파드만 출력) ⇒ 동일 AZ간 접속
ssh ec2-user@$N1 sudo iptables -v --numeric --table nat --list KUBE-SERVICES
Chain KUBE-SERVICES (2 references)
 pkts bytes target     prot opt in     out     source               destination
    0     0 KUBE-SVC-JD5MR3NA4I4DYORP  tcp  --  *      *       0.0.0.0/0            10.100.0.10          /* kube-system/kube-dns:metrics cluster IP */ tcp dpt:9153
    0     0 KUBE-SVC-ERIFXISQEP7F7OF4  tcp  --  *      *       0.0.0.0/0            10.100.0.10          /* kube-system/kube-dns:dns-tcp cluster IP */ tcp dpt:53
    0     0 KUBE-SVC-NPX46M4PTMTKRN6Y  tcp  --  *      *       0.0.0.0/0            10.100.0.1           /* default/kubernetes:https cluster IP */ tcp dpt:443
    0     0 KUBE-SVC-I7SKRZYQ7PWYV5X7  tcp  --  *      *       0.0.0.0/0            10.100.44.181        /* kube-system/eks-extension-metrics-api:metrics-api cluster IP */ tcp dpt:443
    0     0 KUBE-SVC-7EJNTS7AENER2WX5  tcp  --  *      *       0.0.0.0/0            10.100.233.75        /* kube-system/kube-ops-view:http cluster IP */ tcp dpt:8080
    0     0 KUBE-SVC-UAGC4PYEYZJJEW6D  tcp  --  *      *       0.0.0.0/0            10.100.157.248       /* kube-system/aws-load-balancer-webhook-service:webhook-server cluster IP */ tcp dpt:443
  100  9600 KUBE-SVC-TCOU7JCQXEZGVUNU  udp  --  *      *       0.0.0.0/0            10.100.0.10          /* kube-system/kube-dns:dns cluster IP */ udp dpt:53
    0     0 KUBE-SVC-Z4ANX4WAEWEBLCTM  tcp  --  *      *       0.0.0.0/0            10.100.190.78        /* kube-system/metrics-server:https cluster IP */ tcp dpt:443
  100  6000 KUBE-SVC-KBDEBIL6IU6WL7RF  tcp  --  *      *       0.0.0.0/0            10.100.120.116       /* default/svc-clusterip:svc-webport cluster IP */ tcp dpt:80
   91  5460 KUBE-NODEPORTS  all  --  *      *       0.0.0.0/0            0.0.0.0/0            /* kubernetes service nodeports; NOTE: this must be the last rule in this chain */ ADDRTYPE match dst-type LOCAL

# 노드1에서 SVC 정책 확인 : SEP(Endpoint) 파드 1개 확인(해당 노드와 같은 AZ에 배포된 파드만 출력) >> 동일 AZ간 접속
ssh ec2-user@$N1 sudo iptables -v --numeric --table nat --list KUBE-SVC-KBDEBIL6IU6WL7RF
Chain KUBE-SVC-KBDEBIL6IU6WL7RF (1 references)
 pkts bytes target     prot opt in     out     source               destination
  100  6000 KUBE-SEP-ZK6PD3R57DDIWT4Z  all  --  *      *       0.0.0.0/0            0.0.0.0/0            /* default/svc-clusterip:svc-webport -> 192.168.1.172:8080 */

# 노드2에서 SVC 정책 확인 : SEP(Endpoint) 파드 1개 확인(해당 노드와 같은 AZ에 배포된 파드만 출력) >> 동일 AZ간 접속
ssh ec2-user@$N2 sudo iptables -v --numeric --table nat --list KUBE-SVC-KBDEBIL6IU6WL7RF
Chain KUBE-SVC-KBDEBIL6IU6WL7RF (1 references)
 pkts bytes target     prot opt in     out     source               destination
    0     0 KUBE-SEP-NZ6KTGH5KJYADWUA  all  --  *      *       0.0.0.0/0            0.0.0.0/0            /* default/svc-clusterip:svc-webport -> 192.168.2.48:8080 */

# 노드3에서 SVC 정책 확인 : SEP(Endpoint) 파드 1개 확인(해당 노드와 같은 AZ에 배포된 파드만 출력) >> 동일 AZ간 접속
ssh ec2-user@$N3 sudo iptables -v --numeric --table nat --list KUBE-SVC-KBDEBIL6IU6WL7RF
Chain KUBE-SVC-KBDEBIL6IU6WL7RF (1 references)
 pkts bytes target     prot opt in     out     source               destination
    0     0 KUBE-SEP-5UNMTINA7J54GUNI  all  --  *      *       0.0.0.0/0            0.0.0.0/0            /* default/svc-clusterip:svc-webport -> 192.168.3.148:8080 */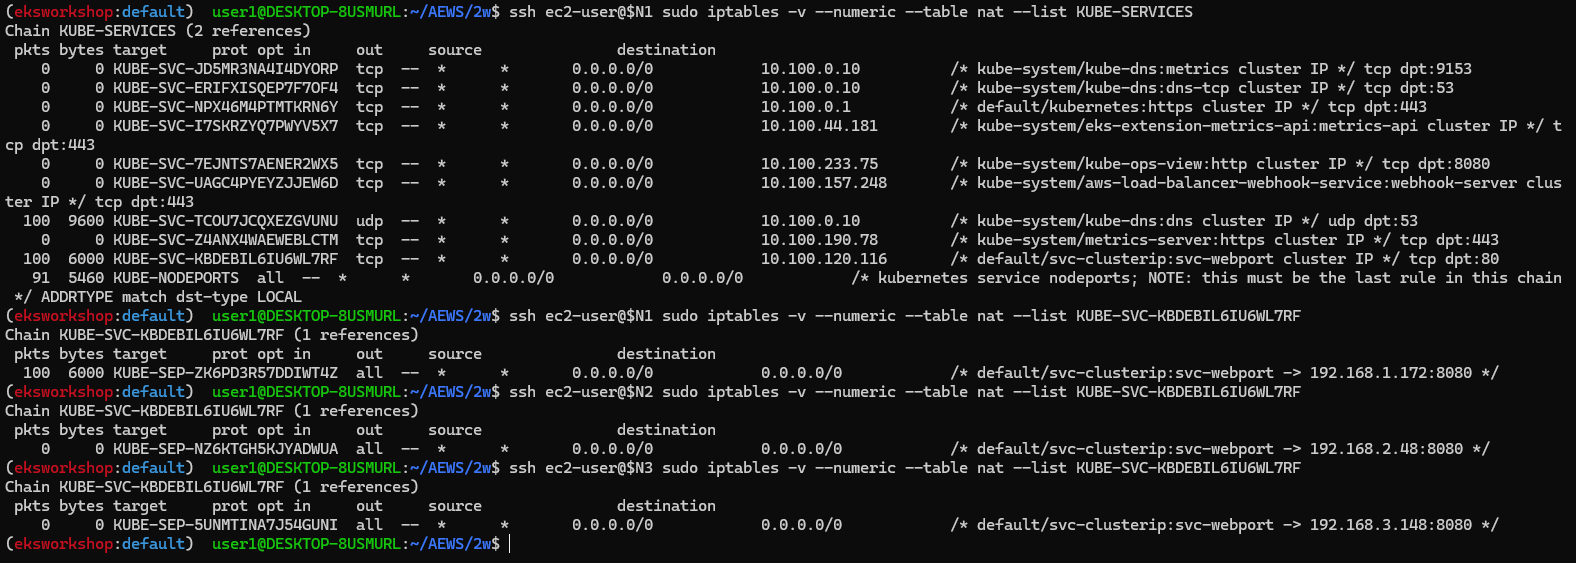
- (추가 테스트) 만약 파드 갯수를 1개로 줄여서 같은 AZ에 목적지 파드가 없을 경우?
# 파드 갯수를 1개로 줄이기
kubectl scale deployment deploy-echo --replicas 1
# 동일 AZ일 경우 0 -> 1 시도
kubectl scale deployment deploy-echo --replicas 0
kubectl scale deployment deploy-echo --replicas 1

# 파드 AZ 확인 : 아래 처럼 현재 다른 AZ에 배포
kubectl get pod -owide
NAME                           READY   STATUS    RESTARTS   AGE   IP              NODE                                               NOMINATED NODE   READINESS GATES
deploy-echo-7f67d598dc-h9vst   1/1     Running   0          18m   192.168.2.65    ip-192-168-2-248.ap-northeast-2.compute.internal   <none>           <none>
netshoot-pod                   1/1     Running   0          66m   192.168.1.137   ip-192-168-1-225.ap-northeast-2.compute.internal   <none>           <none>

# 100번 반복 접속 : 다른 AZ이지만 목적지파드로 접속됨!
kubectl exec -it netshoot-pod -- zsh -c "for i in {1..100}; do curl -s svc-clusterip | grep Hostname; done | sort | uniq -c | sort -nr"
  100 Hostname: deploy-echo-7f67d598dc-h9vst


ssh ec2-user@$N1 sudo iptables -v --numeric --table nat --list KUBE-SERVICES

# 아래 3개 노드 모두 SVC에 1개의 SEP 정책 존재
ssh ec2-user@$N1 sudo iptables -v --numeric --table nat --list KUBE-SVC-KBDEBIL6IU6WL7RF
Chain KUBE-SVC-KBDEBIL6IU6WL7RF (1 references)
 pkts bytes target     prot opt in     out     source               destination
  100  6000 KUBE-SEP-XFCOE5ZRIDUONHHN  all  --  *      *       0.0.0.0/0            0.0.0.0/0            /* default/svc-clusterip:svc-webport -> 192.168.2.65:8080 */

ssh ec2-user@$N2 sudo iptables -v --numeric --table nat --list KUBE-SVC-KBDEBIL6IU6WL7RF
Chain KUBE-SVC-KBDEBIL6IU6WL7RF (1 references)
 pkts bytes target     prot opt in     out     source               destination
    0     0 KUBE-SEP-XFCOE5ZRIDUONHHN  all  --  *      *       0.0.0.0/0            0.0.0.0/0            /* default/svc-clusterip:svc-webport -> 192.168.2.65:8080 */

ssh ec2-user@$N3 sudo iptables -v --numeric --table nat --list KUBE-SVC-KBDEBIL6IU6WL7RF
Chain KUBE-SVC-KBDEBIL6IU6WL7RF (1 references)
 pkts bytes target     prot opt in     out     source               destination
    0     0 KUBE-SEP-XFCOE5ZRIDUONHHN  all  --  *      *       0.0.0.0/0            0.0.0.0/0            /* default/svc-clusterip:svc-webport -> 192.168.2.65:8080 */

# endpointslices 확인 : hint 정보 없음
kubectl get endpointslices -l kubernetes.io/service-name=svc-clusterip -o yaml- (참고) Topology Aware Hint 설정 제거
kubectl annotate service svc-clusterip "service.kubernetes.io/topology-mode-"- 실습 리소스 삭제: kubectl delete deploy deploy-echo; kubectl delete svc svc-clusterip
10. Amazon EKS now supports Amazon Application Recovery Controller
- Enable EKS Zonal Shift to avoid impaired Availability Zones - Link
- Learn about Amazon Application Recovery Controller’s (ARC) Zonal Shift in Amazon EKS - Link

- Amazon EKS now supports Amazon Application Recovery Controller - Link
- Monitoring and automating recovery from AZ impairments in Amazon EKS with Istio and ARC Zonal Shift - Link
- Disaster Recovery with Amazon Route 53 Application Recovery Controller (ARC) - Link
12. Using AWS Load Balancer Controller for blue/green deployment, canary deployment and A/B testing
Using AWS Load Balancer Controller for blue/green deployment, canary deployment and A/B testing | Amazon Web Services
In the past, our customers have commonly used solutions such as Flagger, service mesh, or CI/CD to enable blue/green deployment, A/B testing, and traffic management. The AWS Load Balancer Controller (formerly known as ALB Ingress Controller) enables EKS us
aws.amazon.com
☞ ALB 동작 소개
- Weighted target group 가중치가 적용된 대상 그룹
- AWS 고객이 블루/그린 및 카나리아 배포와 A/B 테스트 전략을 채택할 수 있도록 돕기 위해 AWS는 2019년 11월에 애플리케이션 로드 밸런서에 대한 가중 대상 그룹을 발표했습니다. 여러 대상 그룹을 리스너 규칙 의 동일한 전달 작업 에 연결 하고 각 그룹에 대한 가중치를 지정할 수 있습니다.
- 이를 통해 개발자는 트래픽을 여러 버전의 애플리케이션에 분산하는 방법을 제어할 수 있습니다. 예를 들어, 가중치가 8과 2인 두 개의 대상 그룹이 있는 규칙을 정의하면 로드 밸런서는 트래픽의 80%를 첫 번째 대상 그룹으로, 20%를 다른 대상 그룹으로 라우팅합니다.
- Advanced request routing 고급 요청 라우팅
- AWS는 가중치가 적용된 대상 그룹 외에도 2019년에 고급 요청 라우팅 기능을 발표했습니다 . 고급 요청 라우팅은 개발자에게 표준 및 사용자 지정 HTTP 헤더와 메서드, 요청 경로, 쿼리 문자열, 소스 IP 주소를 기반으로 규칙을 작성하고 트래픽을 라우팅할 수 있는 기능을 제공합니다.
- 이 새로운 기능은 라우팅을 위한 프록시 플릿의 필요성을 없애 애플리케이션 아키텍처를 간소화하고, 로드 밸런서에서 원치 않는 트래픽을 차단하며, A/B 테스트를 구현할 수 있도록 합니다.
- AWS Load Balancer Controller AWS 로드 밸런서 컨트롤러
- AWS Load Balancer Controller 는 Kubernetes 클러스터의 Elastic Load Balancer를 관리하는 데 도움이 되는 컨트롤러입니다. 애플리케이션 로드 밸런서를 프로비저닝하여 Kubernetes 인그레스 리소스를 충족합니다.
- Kubernetes 인그레스 객체에 주석을 추가하여 프로비저닝된 애플리케이션 로드 밸런서의 동작을 사용자 지정할 수 있습니다. 이를 통해 개발자는 애플리케이션 로드 밸런서를 구성하고 Kubernetes 기본 의미 체계를 사용하여 블루/그린, 카나리아 및 A/B 배포를 실현할 수 있습니다.
- 예를 들어, 다음 인그레스 주석은 애플리케이션 로드 밸런서를 구성하여 두 버전의 애플리케이션 간에 트래픽을 분할합니다.
annotations:
   ...
  alb.ingress.kubernetes.io/actions.blue-green: |
    {
      "type":"forward",
      "forwardConfig":{
        "targetGroups":[
          {
            "serviceName":"hello-kubernetes-v1",
            "servicePort":"80",
            "weight":50
          },
          {
            "serviceName":"hello-kubernetes-v2",
            "servicePort":"80",
            "weight":50
          }
        ]
      }
    }
실습
☞ Deploy the sample application version 1 and version 2
- The sample application used here is hello-kubernetes. Deploy two versions of the applications with custom messages and set the service type to ClusterIP:
#
git clone https://github.com/paulbouwer/hello-kubernetes.git
tree hello-kubernetes/

# Install sample application version 1
helm install --create-namespace --namespace hello-kubernetes v1 \
  ./hello-kubernetes/deploy/helm/hello-kubernetes \
  --set message="You are reaching hello-kubernetes version 1" \
  --set ingress.configured=true \
  --set service.type="ClusterIP"

# Install sample application version 2
helm install --create-namespace --namespace hello-kubernetes v2 \
  ./hello-kubernetes/deploy/helm/hello-kubernetes \
  --set message="You are reaching hello-kubernetes version 2" \
  --set ingress.configured=true \
  --set service.type="ClusterIP"

# 확인
kubectl get-all -n hello-kubernetes
kubectl get pod,svc,ep -n hello-kubernetes
kubectl get pod -n hello-kubernetes --label-columns=app.kubernetes.io/instance,pod-template-hash
☞ Deploy ingress and test the blue/green deployment
- Ingress annotation alb.ingress.kubernetes.io/actions.${action-name} provides a method for configuring custom actions on the listener of an Application Load Balancer, such as redirect action, forward action. With forward action, multiple target groups with different weights can be defined in the annotation. AWS Load Balancer Controller provisions the target groups and configures the listener rules as per the annotation to direct the traffic. For example, the following ingress resource configures the Application Load Balancer to forward all traffic to hello-kubernetes-v1 service (weight: 100 vs. 0).
- Note, the action-name in the annotation must match the serviceName in the ingress rules, and servicePort must be use-annotation as in the previous code snippet.
#
cat <<EOF | kubectl apply -f -
apiVersion: networking.k8s.io/v1
kind: Ingress
metadata:
  name: "hello-kubernetes"
  namespace: "hello-kubernetes"
  annotations:
    alb.ingress.kubernetes.io/scheme: internet-facing
    alb.ingress.kubernetes.io/target-type: ip
    alb.ingress.kubernetes.io/actions.blue-green: |
      {
        "type":"forward",
        "forwardConfig":{
          "targetGroups":[
            {
              "serviceName":"hello-kubernetes-v1",
              "servicePort":"80",
              "weight":100
            },
            {
              "serviceName":"hello-kubernetes-v2",
              "servicePort":"80",
              "weight":0
            }
          ]
        }
      }
  labels:
    app: hello-kubernetes
spec:
  ingressClassName: alb
  rules:
    - http:
        paths:
          - path: /
            pathType: Prefix
            backend:
              service:
                name: blue-green
                port:
                  name: use-annotation
EOF

# 확인
kubectl get ingress -n hello-kubernetes
kubectl describe ingress -n hello-kubernetes
...
Rules:
  Host        Path  Backends
  ----        ----  --------
  *
              /   blue-green:use-annotation (<error: services "blue-green" not found>)
Annotations:  alb.ingress.kubernetes.io/actions.blue-green:
                {
                  "type":"forward",
                  "forwardConfig":{
                    "targetGroups":[
                      {
                        "serviceName":"hello-kubernetes-v1",
                        "servicePort":"80",
                        "weight":100
                      },
                      {
                        "serviceName":"hello-kubernetes-v2",
                        "servicePort":"80",
                        "weight":0
                      }
                    ]
                  }
                }
              alb.ingress.kubernetes.io/scheme: internet-facing
              alb.ingress.kubernetes.io/target-type: ip
...

# 반복 접속 확인
ELB_URL=$(kubectl get ingress -n hello-kubernetes -o=jsonpath='{.items[0].status.loadBalancer.ingress[0].hostname}')
while true; do curl -s $ELB_URL | grep version; sleep 1; done
  You are reaching hello-kubernetes version 1
  You are reaching hello-kubernetes version 1
  ...
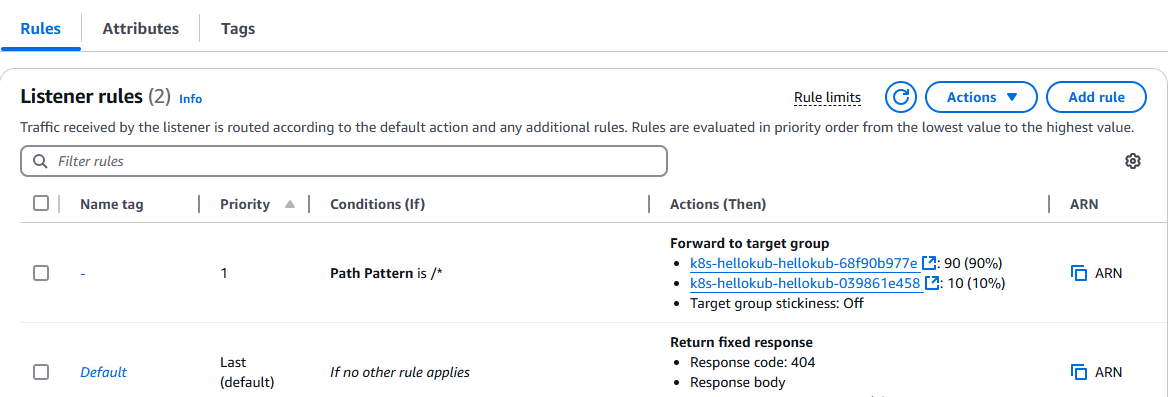
- ALB Listener rules 에서 2개의 Target group 확인(weight)

☞ Blue/green deployment

- To perform the blue/green deployment, update the ingress annotation to move all weight to version 2:
#
cat <<EOF | kubectl apply -f -
apiVersion: networking.k8s.io/v1
kind: Ingress
metadata:
name: "hello-kubernetes"
namespace: "hello-kubernetes"
annotations:
alb.ingress.kubernetes.io/scheme: internet-facing
alb.ingress.kubernetes.io/target-type: ip
alb.ingress.kubernetes.io/actions.blue-green: |
{
"type":"forward",
"forwardConfig":{
"targetGroups":[
{
"serviceName":"hello-kubernetes-v1",
"servicePort":"80",
"weight":0
},
{
"serviceName":"hello-kubernetes-v2",
"servicePort":"80",
"weight":100
}
]
}
}
labels:
app: hello-kubernetes
spec:
ingressClassName: alb
rules:
- http:
paths:
- path: /
pathType: Prefix
backend:
service:
name: blue-green
port:
name: use-annotation
EOF
# 확인
kubectl describe ingress -n hello-kubernetes
Rules:
Host Path Backends
---- ---- --------
*
/ blue-green:use-annotation (<error: services "blue-green" not found>)
Annotations: alb.ingress.kubernetes.io/actions.blue-green:
{
"type":"forward",
"forwardConfig":{
"targetGroups":[
{
"serviceName":"hello-kubernetes-v1",
"servicePort":"80",
"weight":0
},
{
"serviceName":"hello-kubernetes-v2",
"servicePort":"80",
"weight":100
}
]
}
}
alb.ingress.kubernetes.io/scheme: internet-facing
alb.ingress.kubernetes.io/target-type: ip
Events:
# 반복 접속 확인 : 적용에 약간의 시간 소요
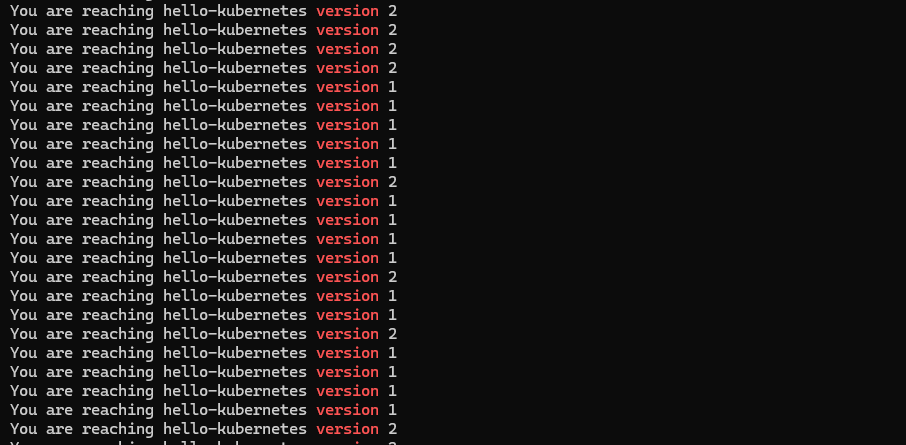
ELB_URL=$(kubectl get ingress -n hello-kubernetes -o=jsonpath='{.items[0].status.loadBalancer.ingress[0].hostname}')
while true; do curl -s $ELB_URL | grep version; sleep 1; done
You are reaching hello-kubernetes version 2
You are reaching hello-kubernetes version 2
...


☞ Deploy Ingress and test the canary deployment

- 모든 트래픽을 버전 2로 이동하는 대신, 버전 2의 가중치를 단계적으로 증가시키며 트래픽을 천천히 이동시킬 수 있습니다. 이를 통해 버전 2가 본격적으로 더 많은 트래픽을 받기 전에, 운영 환경의 일부 트래픽을 대상으로 검증할 수 있습니다. 다음 예제에서는 전체 트래픽의 10%를 버전 2로 전환하고, 나머지 90%의 트래픽은 여전히 버전 1로 유지됩니다.
#
cat <<EOF | kubectl apply -f -
apiVersion: networking.k8s.io/v1
kind: Ingress
metadata:
  name: "hello-kubernetes"
  namespace: "hello-kubernetes"
  annotations:
    alb.ingress.kubernetes.io/scheme: internet-facing
    alb.ingress.kubernetes.io/target-type: ip
    alb.ingress.kubernetes.io/actions.blue-green: |
      {
        "type":"forward",
        "forwardConfig":{
          "targetGroups":[
            {
              "serviceName":"hello-kubernetes-v1",
              "servicePort":"80",
              "weight":90
            },
            {
              "serviceName":"hello-kubernetes-v2",
              "servicePort":"80",
              "weight":10
            }
          ]
        }
      }
  labels:
    app: hello-kubernetes
spec:
  ingressClassName: alb
  rules:
    - http:
        paths:
          - path: /
            pathType: Prefix
            backend:
              service:
                name: blue-green
                port:
                  name: use-annotation
EOF

# 확인
kubectl describe ingress -n hello-kubernetes
  Host        Path  Backends
  ----        ----  --------
  *
              /   blue-green:use-annotation (<error: services "blue-green" not found>)
Annotations:  alb.ingress.kubernetes.io/actions.blue-green:
                {
                  "type":"forward",
                  "forwardConfig":{
                    "targetGroups":[
                      {
                        "serviceName":"hello-kubernetes-v1",
                        "servicePort":"80",
                        "weight":90
                      },
                      {
                        "serviceName":"hello-kubernetes-v2",
                        "servicePort":"80",
                        "weight":10
                      }
                    ]
                  }
                }
              alb.ingress.kubernetes.io/scheme: internet-facing
              alb.ingress.kubernetes.io/target-type: ip

# 반복 접속 확인 : 적용에 약간의 시간 소요
ELB_URL=$(kubectl get ingress -n hello-kubernetes -o=jsonpath='{.items[0].status.loadBalancer.ingress[0].hostname}')
while true; do curl -s $ELB_URL | grep version; sleep 1; done

# 100번 접속
for i in {1..100};  do curl -s $ELB_URL | grep version ; done | sort | uniq -c | sort -nr

☞ Argo Rollouts
- 운영 환경에서 카나리 배포(Canary Deployment)를 수행할 때, 일반적으로 트래픽은 작은 단위로 점진적으로 전환됩니다. 보통은 일정 수준의 자동화가 적용되어 있으며, 다양한 성능 모니터링 시스템과 통합하여 진행됩니다. 이를 통해 각 단계에서 오류가 발생하지 않거나, 허용 가능한 임계값 이하인지 확인할 수 있습니다.
- Argo Rollouts는 AWS Load Balancer Controller의 어노테이션 기반 트래픽 제어 기능을 공식적으로 지원하며, 업데이트 중에 새로운 버전으로 트래픽을 점진적으로 전환할 수 있도록 도와줍니다. 또한, Argo Rollouts는 다양한 모니터링 제공업체의 메트릭을 조회하고 해석하여 주요 KPI를 검증하며, 업데이트 진행 중 자동으로 승격(Promotion)하거나 롤백(Rollback)할 수 있도록 지원합니다.
☞ Deploy ingress and test the A/B testing

- Ingress 어노테이션 alb.ingress.kubernetes.io/conditions.${conditions-name} 는 Ingress 스펙의 기존 호스트/경로 조건 외에도 추가적인 라우팅 조건을 지정하는 방법을 제공합니다. 추가적인 라우팅 조건은 http-header, http-request-method, query-string 및 source-ip를 기반으로 설정할 수 있습니다. 이는 개발자들에게 서비스 메쉬와 같은 별도의 라우팅 시스템을 구축하고 관리할 필요 없이 A/B 테스트 구현을 위한 다양한 고급 라우팅 옵션을 제공합니다.
- AWS Load Balancer Controller는 어노테이션에 따라 리스너 규칙을 구성하여 일부 트래픽을 특정 백엔드로 전달하도록 설정합니다. 다음 예제에서는 기본적으로 모든 요청이 버전 1로 전송됩니다. 아래 Ingress 리소스는 요청에 특정 HTTP 헤더 HeaderName=HeaderValue1 이 포함될 경우 트래픽을 버전 2로 라우팅합니다.
#
cat <<EOF | kubectl apply -f -
apiVersion: networking.k8s.io/v1
kind: Ingress
metadata:
name: "hello-kubernetes"
namespace: "hello-kubernetes"
annotations:
alb.ingress.kubernetes.io/scheme: internet-facing
alb.ingress.kubernetes.io/target-type: ip
alb.ingress.kubernetes.io/conditions.ab-testing: >
[{"field":"http-header","httpHeaderConfig":{"httpHeaderName": "HeaderName", "values":["aews-study"]}}]
alb.ingress.kubernetes.io/actions.ab-testing: >
{"type":"forward","forwardConfig":{"targetGroups":[{"serviceName":"hello-kubernetes-v2","servicePort":80}]}}
labels:
app: hello-kubernetes
spec:
ingressClassName: alb
rules:
- http:
paths:
- path: /
pathType: Prefix
backend:
service:
name: ab-testing
port:
name: use-annotation
- path: /
pathType: Prefix
backend:
service:
name: hello-kubernetes-v1
port:
name: http
EOF
# 확인
kubectl describe ingress -n hello-kubernetes
Host Path Backends
---- ---- --------
*
/ ab-testing:use-annotation (<error: services "ab-testing" not found>)
/ hello-kubernetes-v1:http (192.168.2.48:8080,192.168.1.215:8080)
Annotations: alb.ingress.kubernetes.io/actions.ab-testing:
{"type":"forward","forwardConfig":{"targetGroups":[{"serviceName":"hello-kubernetes-v2","servicePort":80}]}}
alb.ingress.kubernetes.io/conditions.ab-testing:
[{"field":"http-header","httpHeaderConfig":{"httpHeaderName": "HeaderName", "values":["aews-study"]}}]
alb.ingress.kubernetes.io/scheme: internet-facing
alb.ingress.kubernetes.io/target-type: ip
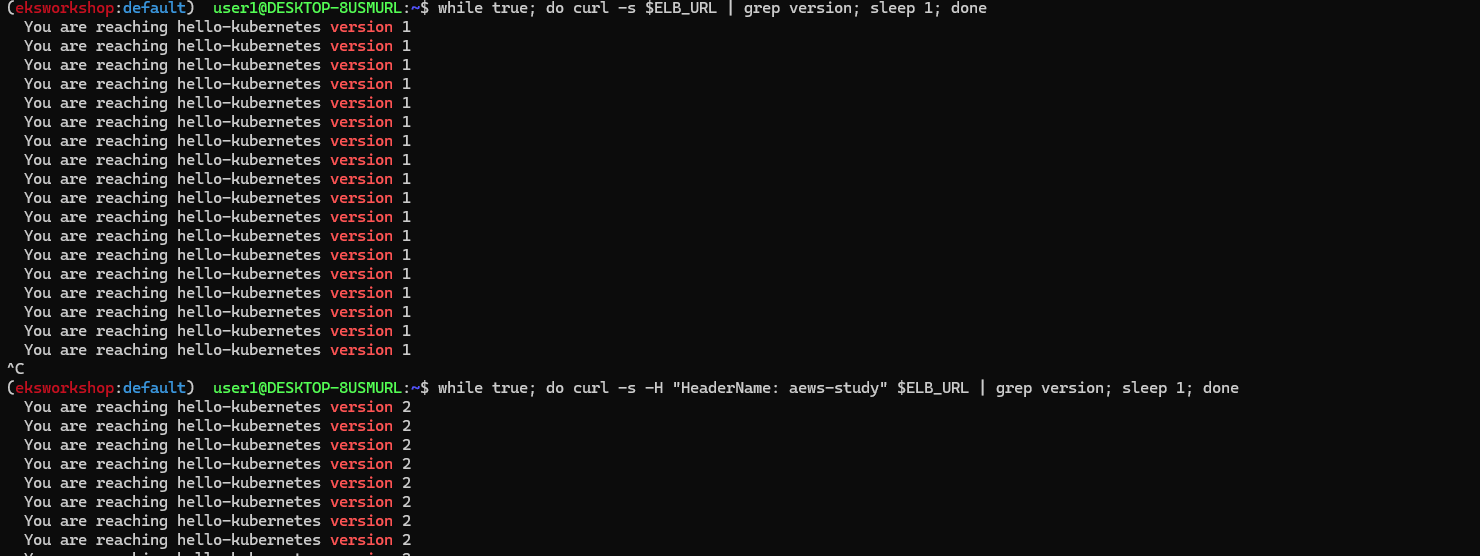
# 반복 접속 확인 : 적용에 약간의 시간 소요
ELB_URL=$(kubectl get ingress -n hello-kubernetes -o=jsonpath='{.items[0].status.loadBalancer.ingress[0].hostname}')
while true; do curl -s $ELB_URL | grep version; sleep 1; done
...
while true; do curl -s -H "HeaderName: aews-study" $ELB_URL | grep version; sleep 1; done
...
# 100번 접속
for i in {1..100}; do curl -s $ELB_URL | grep version ; done | sort | uniq -c | sort -nr
for i in {1..100}; do curl -s -H "HeaderName: aews-study" $ELB_URL | grep version ; done | sort | uniq -c | sort -nr


- 삭제 : kubectl delete ingress -n hello-kubernetes hello-kubernetes && kubectl delete ns hello-kubernetes
(실습 완료 후) 자원 삭제
- Amazon EKS 클러스터 삭제(10분 정도 소요): eksctl delete cluster --name $CLUSTER_NAME
- (클러스터 삭제 완료 확인 후) AWS CloudFormation 스택 삭제 : aws cloudformation delete-stack --stack-name myeks
* 이번 스터디는 네트워크 관련된 중요한 부분도 많았는데 분량도 많아서 나머지는 차차 더 공부해서 정리해야 할 것 같다.
'AEWS study' 카테고리의 다른 글
| 4주차 - EKS Observability - #1 (0) | 2025.02.28 |
|---|---|
| 3주차 - EKS Storage, Managed Node Groups - #2 (0) | 2025.02.22 |
| 3주차 - EKS Storage, Managed Node Groups - #1 (0) | 2025.02.22 |
| [2주차] EKS Networking - #1 (0) | 2025.02.13 |
| [1주차] Amzaon EKS 설치 및 기본 사용 (0) | 2025.02.07 |